
Bleed, Slug and Crop Marks, Oh My!
When you design for print, there are rules you must follow. Especially when you are going to have the work printed by a professional digital or lithographic printing company like us 🙂
I know it can be tempting to break certain rules, but many are there for our protection, especially in print. You want your printed material to be the best it can be, right? Well, so do we!
The process starts when you’re first setting up your document to create your design, whether you’re using InDesign, Quark, Photoshop, Illustrator or any of the similar programs available.
Let’s look at what bleed, slug and crop marks actually are. Why they are vital (even if you are the rebellious sort) and how to set them up. Let’s go!
Bleed and Why It’s Absolutely Vital!
Bleed can be confusing, especially if you don’t know what it’s for and why it’s important. Bleed refers to the area of the artwork that extends beyond the size of the document. The idea is that you won’t see the bleed; it will be trimmed. But, if there was no bleed, when we trim the printed material to size, white paper may be seen if the cut isn’t exact – usually due to the margin of error with sheets of paper that are so big.
The idea of extending the image or background colour beyond the actual finished print size protects you. If there is any variation when cutting, you won’t see the end of the print or white, unprinted paper. As you can imagine, not including bleed is a mistake people don’t make many times after the first. It looks pretty horrible. The bleed is a way to stop problems occurring with the fine tolerances when cutting the printed paper.

So to recap: the bleed area will be trimmed off, but is there as a safety zone so that any variations in trimming or cutting down don’t show. If there is a blue background over the whole printed area, then the blue should extend to cover the bleed area. If a photo/image is going to be placed right up to the printed document edge, then it should go into the bleed area. Bleed really is one of the most important aspects of document layout and design and should never be overlooked if you want to achieve professional results.
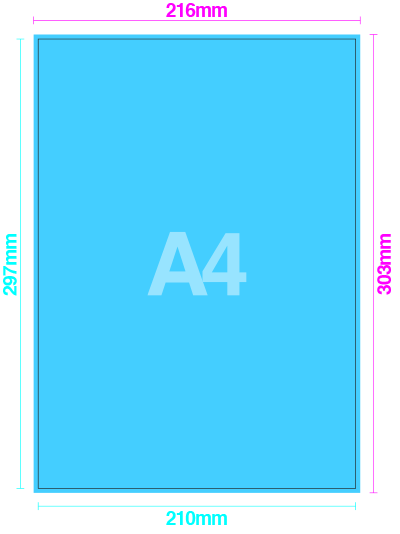
The image above is a common A4 sheet
A4 Paper = 210mm x 297mm
210mm + 6mm* = 216mm
297mm + 6mm* = 303mm
Total Document Size = 216mm x 303mm
*6mm because 3mm bleed is needed on each edge, 3mm on the left & right is 6mm across, and 3mm on top & bottom adds 6mm to the height.
How do I apply Bleed?
The way we apply bleed is similar for all desktop publishing programmes. You need to extend the object box, whether picture or colour, out beyond the edge of your page. Then, when it’s time to create the PDF, you need to set your bleed margins to 3mm (possibly more for some projects, i.e. banners ).
Unfortunately, with programmes such as Microsoft Word, PowerPoint or Adobe Photoshop, you do not have the ability to add bleed when creating a PDF. You must make your page/image size 6mm bigger at the start. This extra 6mm (3mm all around) will then be treated as bleed, which is removed when your job is trimmed. For example, an A4 sheet is 210mm x 297mm. Your A4 page with adequate bleed will be 216mm x 303mm.
We will add tutorials for various software packages in the coming weeks.
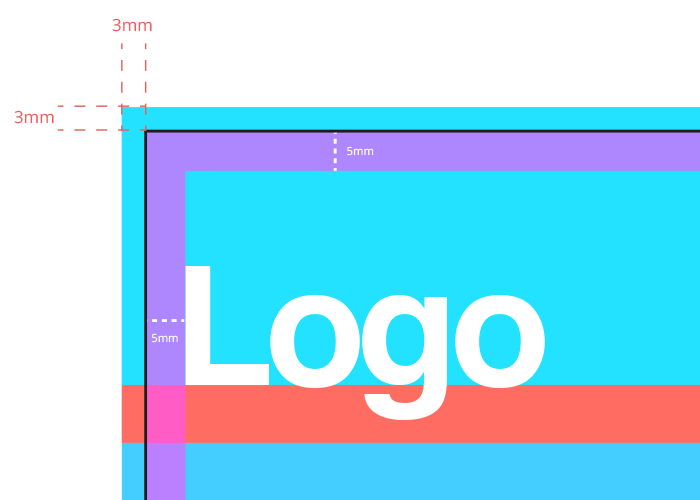
Margins and Safe Zone
In many ways, directly related to the bleed is the margin – the margin creates the internal “safe zone” for the print area. The margin is usually a personal preference, but you should always include some. You see, if the printed document is 210mm wide and you need 3mm bleed on each side for any variations when trimming, then surely you should allow a minimum of 3mm margin for your safe zone (5mm is the preferred standard) in case the trim goes too far the other way. You can, of course, have more of a margin depending on the size of the printed document and your preference – but I would always include a minimum of an equal distance to the bleed for safety so no important information is accidentally cropped.
Why do we need a bleed?
You may see a piece of paper and wonder why bleed is even necessary for printing in this day and age with all the technological breakthroughs in printing. Well, paper is still paper, which means it can vary in size depending on humidity or moisture in the air and many other factors. This is why we need bleed and a safe zone.
Putting it simply, bleed means you get a better-finished product by ensuring you don’t get any white bits of unprinted paper at the edge of your print. If you have a border at the edge that isn’t printed, you will still need bleed, but it will be easy to add if missing.
What is Slug (in inDesign)?
It was recently pointed out to me that de didn’t cover slug, so here we go. With the caveat that we will be talking about what slug is in InDesign and other similar software – because the term slug has had a few different meanings over the years.
In the old days, when people used lead letters to create a print layout, one type of slug was a piece of spacing material used to space paragraphs.
In modern typesetting programs such as Adobe InDesign, slugs hold information that relates to printing, such as a colour bar, or information or other instructions that are used between editors and designers that won’t get printed. For example, if you were working on a magazine layout and multiple team members – it can be helpful to use the slug next to sections to convert information would don’t want to be printed, e.g. ‘we are waiting for the final article’ or ‘the advert is going to be changed’, or ‘the article is in its final form’.
The slug is the area outside the bleed and is mainly extra space for utility and any notes you may need during production that you wouldn’t want to print.
Unlike bleed, the slug is not necessary but can be helpful on certain projects.
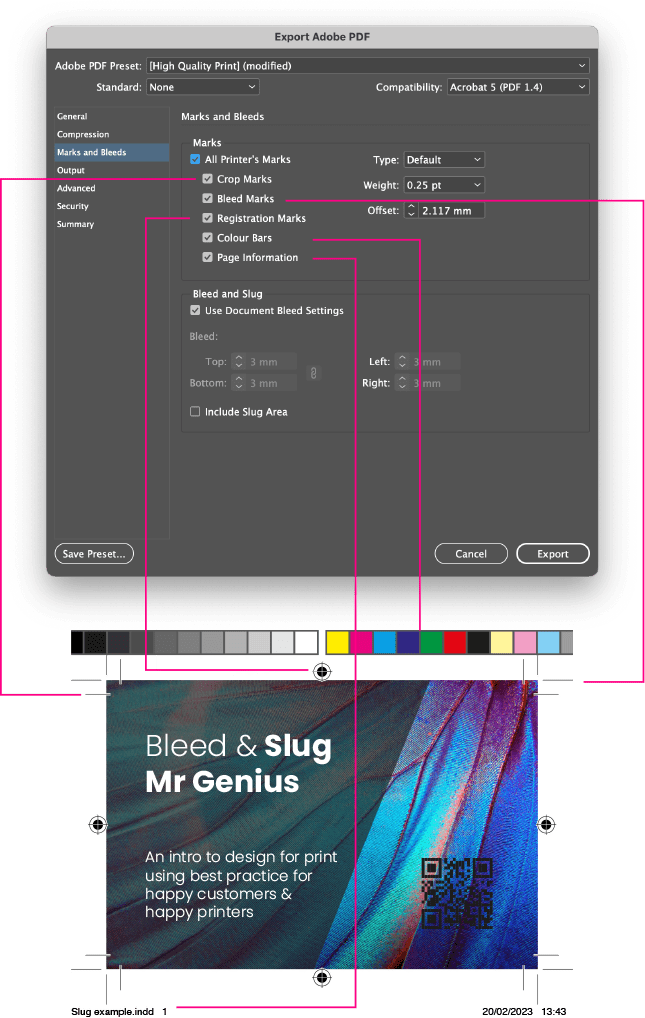
Printer’s Marks in InDesign
Sources: Wikipedia